Unbelievable, but weeks have become so short recently and it is Friday again. I hope you are ready for the next part of my Circles of the Sun CAL as today there will be one of my favourite tutorials. In two previous weeks you made squares with floral motifs but today's block is mostly geometrical, with many overlaid stitches! If you joined this CAL only now, please, be sure to read general information first.
Please, also check Part 1 and Part 2 of this CAL.
TRANSLATIONS
Dutch by Dianne Baan
German by Libminna
Portuguese by Estela Mizukawa
Video tutorial by Esther Dijkstra of It’s all in a Nutshell
If you successfully crocheted two previous squares, this pattern should not be a huge challenge for you. The only difference is that there are more overlaid stitches here, so you should be a bit more attentive, but this is also a basic requirement while working in overlay crochet technique. Again you should be pretty sure where to attach new yarn and where to anchor overlaid stitches. And you should also count very well.
You will need:
- Yarn in 6 colors. I used yarn “Cotton Light” by DROPS (50g/1.76 oz., 105 m/115 yds.) Yarn weight: DK. Texture: 8 ply (11 wpi)
- Crochet hook 3,25 mm (D) or size needed to obtain acceptable gauge. (Please, feel free to choose another yarn weights and the hook to get larger or smaller square).
- Scissors, tapestry needle to weave in ends (I prefer crochet hook for weaving in).
The size of the finished square depends on the yarn and hook you use. My square is approx. 12.5 cm (5 inches) large.
Stitch guide and Abbreviations
US standard abbreviations are used in this pattern. But if you are used to other terms, please check this Crochet Translation Project which might be helpful in translation to your language.
rnd - round
st(s) - stitch(es)
ch - chain
sp(s) - space(s)
yo - yarn over
lp(s) - loop(s)
FL - front loop(s)
BL - back loop(s)
NJ - needle join
sk - skip st(s)
*…* - *crochet following directions* as many times as indicated
slst (slip stitch) - insert hook in indicated st, yo, draw yarn up and pull 2nd lp through the 1st lp on hook.
sc (single crochet) - insert hook in indicated stitch, yo, draw up a lp, yo and pull through both lps on hook.
hdc (half double crochet) – yo, insert hook in indicated st, yo, draw up a lp, yo, pull through all three lps.
dc (double crochet) – yo, insert hook in indicated st, yo, draw up a lp, *yo, pull through 2 lps* twice.
tr2tog (treble crochet 2 together) - *yo twice, insert hook in indicated st, yo, draw up a lp, [yo, pull through 2 lps] twice* twice, yo, pull through all 3 lps on hook.
sc inc - single crochet increase
dc inc - double crochet increase
Copyright LillaBjornCrochet 2015. All rights reserved. This pattern is for unlimited personal use only. Do not reproduce or sell the pattern. The pattern may not be copied in any way (print or digitally), in part or in full. Items may be sold that are made from this pattern as long as the designer is credited. Shop owners, if you wish to make a kit with yarn using this pattern, please request permission and copyright details from me before offering any kits for sale. Please, read Copyright page for more information.
Instructions
Color Key: C1 – Yellow, C2 – Beige, C3 –Rnd 1. Start with yarn C3.
Make magic ring, ch2 (counts as 1st dc) and 11 dc in magic ring; NJ in the 1st dc after ch2. (= 12 dc)
*1 dc inc in each st of rnd 1 (the 1st dc of the rnd will be ch2)* 12 times, NJ in the 1st dc of the rnd after ch2. (= 24 dc)
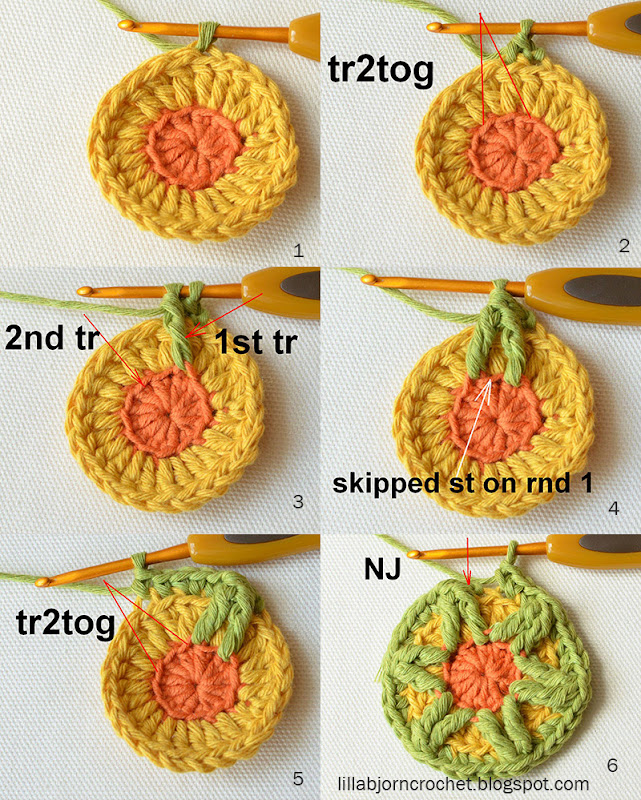
Note: you will get six “V” on this round. There will be two tr’s made in one st of rnd 1. And there will be always on st skipped at the bottom of each “V”
*2 sc (the 1st sc of the rnd will be a ch), 1 tr2tog (FL) (work 1st tr (FL) of this tr2tog in a st of rnd 1 directly under the 1st sc of this repeating section, sk 1 st on rnd 1 and make 2nd tr (FL) of tr2tog in next st on rnd 1), sk no sts on rnd 2, 1 sc, 1 sc inc* 6 times, NJ in the 1st sc of the rnd after ch1. (= 36 sts)
*1 dc inc (the 1st dc of the rnd will be ch2), 2 dc* 12 times, NJ in the 1st dc of the rnd after ch2. (= 48 dc’s)
*4 sc (the 1st sc of the rnd will be a ch),
1 tr2tog (FL) (work 1st tr (FL) in the 1st st of underlying inc of rnd 3, sk 1 st on rnd 3 and make 2nd tr (FL) in next st), sk no sts on rnd 4, 4 sc,
1 tr2tog (FL) (work 1st tr (FL) in the same st of rnd 3 where previous tr was made, sk 3 sts on rnd 3 and make 2nd tr (FL) in next st), sk no sts on rnd 4* 6 times, NJ in the 1st sc of the rnd after ch1. (= 60 sts)
*1 dc inc in tr2tog (the 1st dc of the rnd will be ch 2), 4 dc* 12 times, NJ in the 1st dc of the rnd after ch2. (= 72 sts)
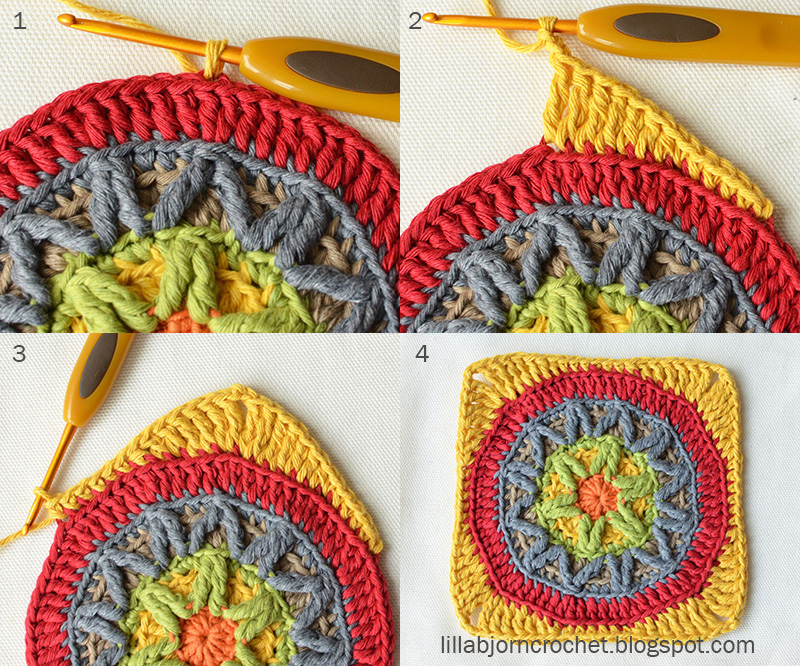
*6 sc (the 1st sc of the rnd will be a ch), 1 hdc, 2 dc, 2 tr, 2 tr in next st, ch2, 2 tr in next st, 2 tr, 2 dc, 1 hdc* 4 times, NJ in the 1st sc of the rnd after ch1. (= 80 sts + 4 ch2-sps)
*12 sc (the 1st sc of the rnd will be a ch), 1 hdc, 2 dc in next ch2-sp, ch2, 2 dc in the same ch2-sp, 1 hdc, 6 sc* 4 times, NJ in the 1st sc of the rnd after ch1. (= 96 sts + 4 ch2-sps)
Congratulations! Your third granny square from Circles of the Sun CAL 2015 is now finished. Don't forget to share it on Facebook and Ravelry. You can find a pin for this block on Pinterest - please, feel free to repin it and share with your friends!
See you next Friday!


Thank you so much, its amazing
ReplyDeleteCU Mela
Thank you!! And you are very welcome :)
ReplyDeleteThanks! I love your beautiful work - thanks for sharing it with us - I got hooked into overlay crochet...wish you a wonderful weekend...;) Sus
ReplyDeletethanks ! I feel as though I am getting in the flow, I am able to look at the square and understand the pattern and technics and think wow I can do that. so excellent teaching, thanks Tatsiana
ReplyDeleteRound 4 says there should be 48 stitches. Round 5 says there should be 60 stitches but no increases were indicated. I did 2 sc and then a sc increase and then 1 more sc for a total of 5 each time in the pattern. That way I got 60 stitches total in the round. I love your patterns so thank you for sharing them with us.
ReplyDeleteHello Jean! There ARE increases on this round! Did you make previous blocks? If yes, then you should have already noticed, that on some rounds increases are made by skipping NO sts behind overlaid stitches. On rnd 5 for example you skip no sts behind EVERY tr2tog. And so in this way you get 12 increases on this round. No error here..
DeleteYes, there are increases! Thanks for the explanation and now it all is clear to me. Think I was just too tired to be working on this new technique last night. I love these patterns so thank you for sharing them with us.
DeleteI just love this pattern....and I've wanted to learn Overlay Crochet for a long time!
ReplyDeleteThough I can't start this right now (with several WIPs I demand of myself I get done first!) I SO want to do this and am planning to do so. I'm saving the pattern to be done - soon - and I WILL do it!
Thank you for sharing this beautiful pattern with us - and for your tutorials! Just awesome!
I am just flabbergasted by the universal sharing and love in this hooky community! I had no idea that when I started following a few blogs and doing a few CALs that I was joining a 'family' - a family of love and sharing!
Too bad we can't spread this feeling around the whole globe...imagine what a peaceful world it would be!
A GIANT THANK YOU TO ALL!
I can't wait to get started on this...have to choose colors and yarn. How do you think a DK would work?
After reading so many raves about Stylecraft DK, I finally tried it...and it is really nice to work with.
HI I am having some trouble with round 3, I keep ending up with 5 to many stitches in the round despite having the right amount of stitches in round 2. So, should I have 5 stitches between each 2 trebles, consisting of 1 sc, 2sc (increase) then 2 more individual sc, so every stitch in round 2 has either 1 or 2 sc in them. I have redone it 4 times and always end up with 41 stitches. Any ideas on what i am doing wrong.
ReplyDeletehm... Without a picture I can only guess. On rnd 3 you should have 6 sts in every of 6 repeats (36 sts in total = 1 tr2tog + 5 sc for one repeat). You should skip NO sts on rnd 2 behind EVERY tr2tog. And another possible problem is that you might make 2 tr's instead of tr2tog... Please, check these two moments. And if you still have trouble - please, post your picture either in my Ravelry group (there is a separate thread to ask questions about block 3) or on my Facebook page. When I see your pictures, I can tell you where the problem is. Thank you! And hope this helps...
ReplyDeleteI press print friendly, but do not getpdf, get print friendly site
ReplyDeleteWorked ok on 1 &. 2 blocks